126252 views 818 likes 57 dislikes
Channel: LearnCoatings – Epoxy Flooring Training
http://www.learncoatings.com for online learning
http://www.ktisis.eu to learn about our epoxy flooring products
This video is based on a recent project we completed. We show all the basic steps required in completing the epoxy
1. Surface preparation – grinding the surface
2. Priming
3. Filling joints and cracks
4. Applying 1st epoxy floor coat
5. Applying 2nd epoxy coat
Welcome to this video, we’re going to go through a step by step process, how we apply an epoxy floor:
-Step one: You need to grind the concrete; you want to make sure that the concrete is going to be in a good condition to prepare the surface, so that it will be ready to accept the new coating on top of the epoxy coating. So here, we’re diamond grinding and we’re also at the same time collecting the dust to make sure that there will be no dust left. Obviously, you need to vacuum afterwards as well, and now we’ve gone on to the priming phase, we’re applying a two component epoxy primer with a roller, at the point here is, you want the primer to penetrate the substrate you want to go deep into the floor, you want to make sure it will be in a good condition for the application, so you can afterwards apply the paint. And now, we finished with the primer and this is how the floor looks afterwards.
So, the priming phase is being completed, you can see the floor, it’s some parts are shining and some parts it’s less shiny, we’re basically inspecting it now, we want to see if there are any holes, any problems in the floor, because the next stage is, you want to make sure that all these cracks in visible holes will be filled up and covered and that’s exactly what we’re going to show you now. Here is an example of a hole or an area that needs repairing, so we will need to apply epoxy grout here and another example where you will need to apply epoxy grout to be sure.
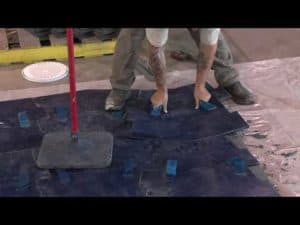
Another important part is, you need to fill up the floor joints, you use the best, is to use an elastic compound and a durable elastic compound to fill up the floor joints, so they don’t show in the final floor, you can cover it on top of the epoxy.
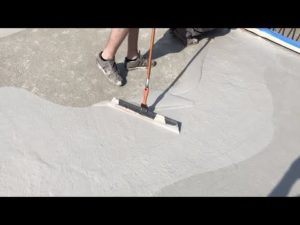
So now, this we’ve actually applied the first coat, we don’t have any footage from the first coat, but what I’m showing you here is the actual floor after the first coat. You can see that in several parts it needs more grinding like all the little problems of being are visible now, so we need to grind this floor again, lightly grind it and sand it, so you can now apply some more, you may have to apply some more grout, some more repairing. The main point is, before you apply the final coat, you want to eliminate all these problems like this one here. And here we see the worker actually grinding the floor again, sanding it more, I’d say, to make sure that you have a perfect floor. And now, we’re getting ready for the second coat, we are now going to mix the two component together, the epoxy resin and the epoxy hardener. And here we see the procedure and how to mix the two products together. And you know, you’ve got to be very careful here, you’ve got to make sure that you empty out all the part of the B. Component and using electrical mixer, you mix for at least two minutes before you start applying the product. Take your time and then, here we see the second coat being applied, the second coat, you want to make sure when you do start, you’ve cleaned up the whole place, there are no visible, there’s no dust there’s nothing, you want to play out a nice final finish.
This is going to be how the floor is going to look and as you see, we are getting a very nice final finish. It will have a small roller sort of mark on it because, it is being applied with a roller, but what the client in this case wanted was a nice clean floor, he didn’t, wasn’t that interested in a self-leveling, he just wanted a nice, clean coated floor.
So, that’s all for now, If you enjoy this video, make sure to subscribe to a channel and you can visit the links on the screen to learn more about us and learn more about our websites, visit learncoating.com to get articles and ktisis.eu for our products. Thank you very much for watching.
Video length: 4:08
Category: People & Blogs
57 comments
* This video was originally published here
Find a local concrete contractor in your area to help you with your concrete flooring needs by searching here on Concrete Floor Pros.
#concretefloorpros